LZUOSS HPC 超算团队选拔赛:AI赛题报告
兰州大学 LZUOSS HPC 超算团队及 ASC 25 选拔题目
文件目录说明
1 | ./ |
实验环境
硬件配置
使用本地笔记本电脑与云超算平台两种硬件环境测试程序,具体配置如下:
本地设备:
- CPU: 12th Gen Intel(R) Core(TM) i7-12700H (逻辑处理器: 20)
- RAM: 16GB
- GPU: NVIDIA GeForce RTX 3060 Laptop GPU
- VRAM: 6GB
云超算平台:
- CPU: 22vCPU
- RAM: 120GB
- GPU: 2卡 * NVIDIA GeForce RTX 3090 GPU
- VRAM: 24GB
软件配置
- WSL2 - Ubuntu 22.04(本地)/ Ubuntu 22.04(云超算平台)
- Python 3.9.20
- Cuda 12.1
- torch==2.5.1+cu121
- transformers==4.46.3
- accelerate==1.1.1
- bitsandbytes==0.44.1
- flash-attn==2.7.0.post2+cu12torch2.5cxx11abiFALSE-cp39-cp39-linux_x86_64(通过手动编译安装)
- lightning==2.4.0
完整软件包列表见
requirements.txt
赛题一:预训练 GPT-2
前言
在本节中,我将详细描述对赛题一的思考、探索、编写和优化过程。我的解题策略是,首先使用 Transformers 库的原生文档提供的结构,构建一个基础的 Baseline 模型。在此基础上,进一步探索多种优化方法,包括使用加速框架、混合精度训练、分布式训练等技术。最后,我会在总结报告中给出所有方法性能对比。
Baseline
首先导入一下必要的库:1
2
3
4
5
6
7
8
9
10
11import torch
from itertools import chain
import wandb
from datasets import load_dataset, load_from_disk
from transformers import DataCollatorForLanguageModeling
from transformers import GPT2LMHeadModel, GPT2Tokenizer, GPT2Config
from transformers import TrainingArguments, Trainer
device = torch.device("cuda" if torch.cuda.is_available() else "cpu")
值得注意的是,这里我使用了 wandb 作为我的训练过程 / 结果可视化平台,以便更好监控模型性能。
为了提高数据加载速度,直接从本地读取离线的 BookCorpus 数据集:1
2
3
4# ds = load_dataset("bookcorpus/bookcorpus", "default")
ds = load_from_disk("bookcorpus")
ds = ds["train"].select(range(10000))
ds = ds.train_test_split(test_size=0.1)
这里,我读取了前 10000 条数据用于训练,其中 10%(即 1000 条)用作验证集。
从预训练的 GPT-2 中加载 tokenizer,并设置填充标记:1
2tokenizer = GPT2Tokenizer.from_pretrained("openai-community/gpt2")
tokenizer.pad_token = tokenizer.eos_token
使用预训练的 tokenizer 将文本数据转换为标记,对数据集应用 tokenize 函数,并批量处理:1
2
3
4
5
6
7def tokenize_fn(data):
return tokenizer(text=data["text"])
tokenized_ds = ds.map(tokenize_fn, batched=True, remove_columns="text")
# tokenized_ds.save_to_disk("bookcorpus/tokenized_ds")
# tokenized_ds = load_from_disk("bookcorpus/tokenized_ds")
为 LLM 准备数据,使用 data collator 转化特征数据为 tensor:1
data_collator = DataCollatorForLanguageModeling(tokenizer, mlm=False)
使用 Transformers 库中的默认配置初始化 GPT-2 模型:1
2config = GPT2Config()
model = GPT2LMHeadModel(config).to(device)
在这部分,定义了GPT-2模型训练的参数,并使用Trainer进行训练管理:1
2
3
4
5
6
7
8
9
10
11
12
13
14
15
16training_args = TrainingArguments(
output_dir="checkpoints", # 模型检查点保存目录
run_name="baseline", # WandB 运行名称
eval_strategy="steps", # 评估策略
eval_steps=50, # 每 50 步评估一次
logging_strategy="steps", # 日志记录策略
logging_steps=50, # 每 50 步记录一次日志
num_train_epochs=3, # 训练 3 个epoch
per_device_train_batch_size=32, # 每个设备的训练批次大小
per_device_eval_batch_size=32, # 每个设备的评估批次大小
learning_rate=2.5e-4, # 学习率
weight_decay=1e-4, # 权重衰减
report_to="wandb", # 报告到WandB
lr_scheduler_type="cosine", # 学习率调度器
warmup_ratio=0.05, # 预热比例
)
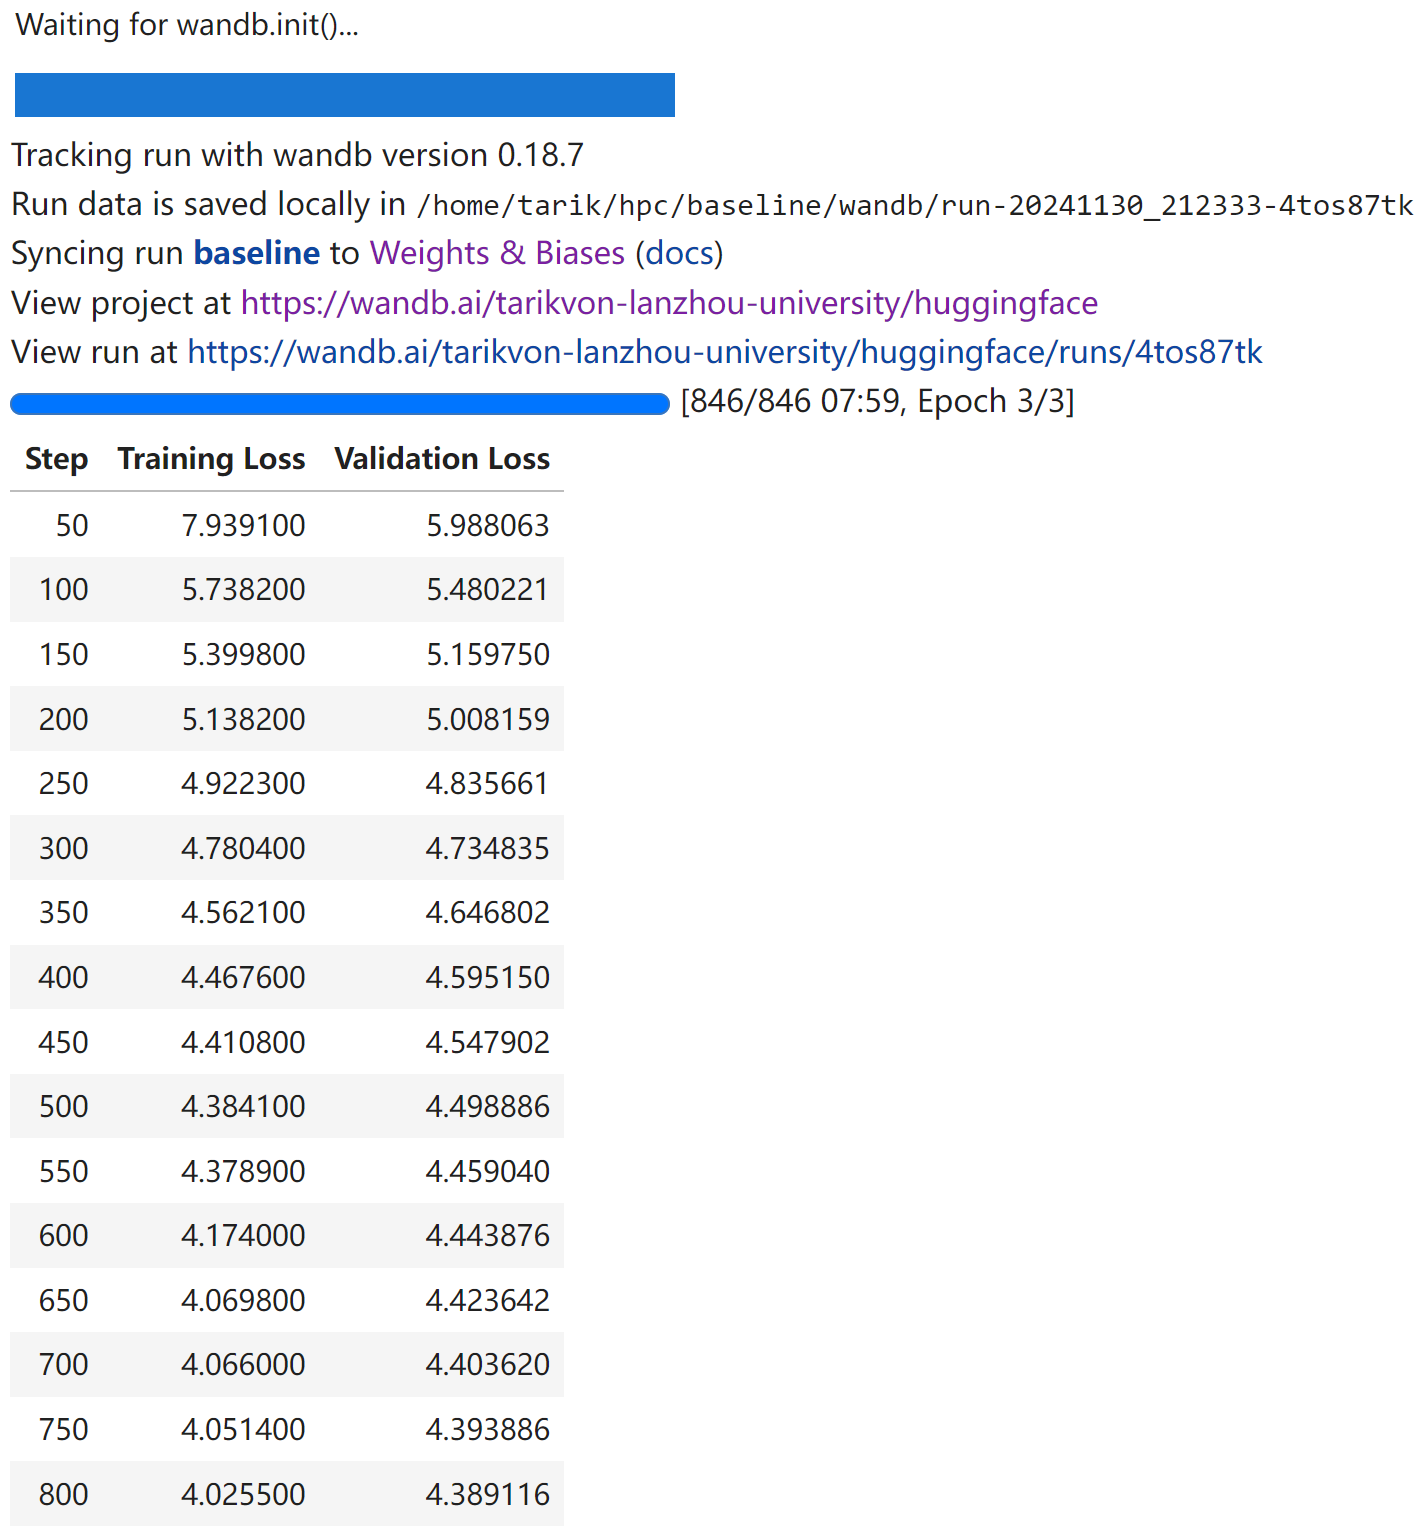
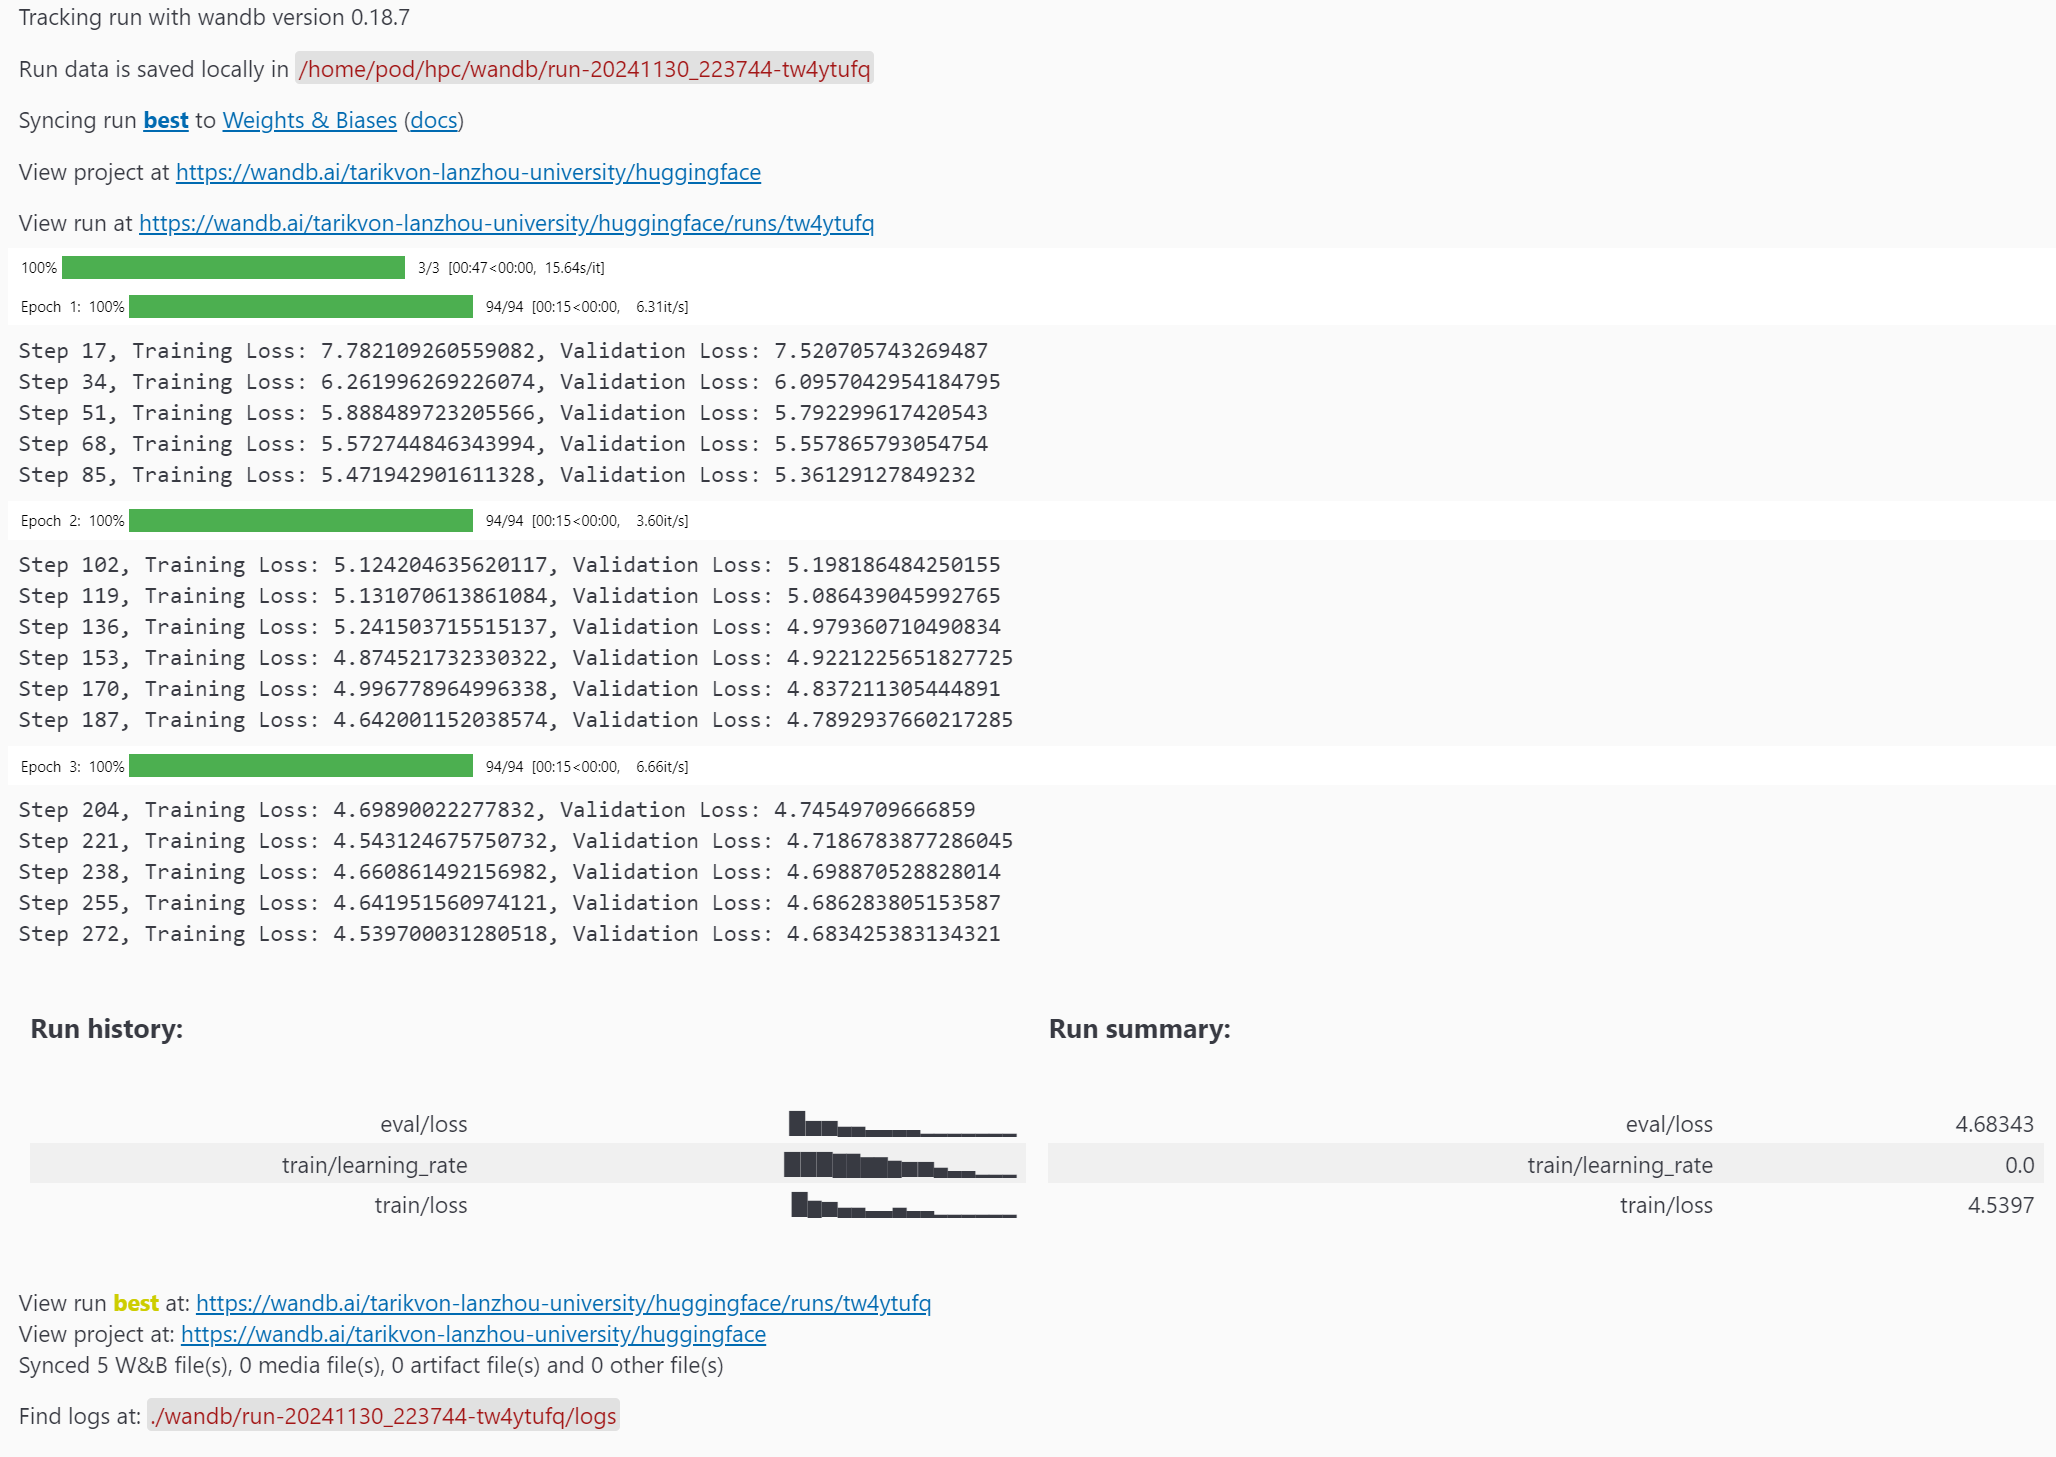
开始训练!1
trainer.train()
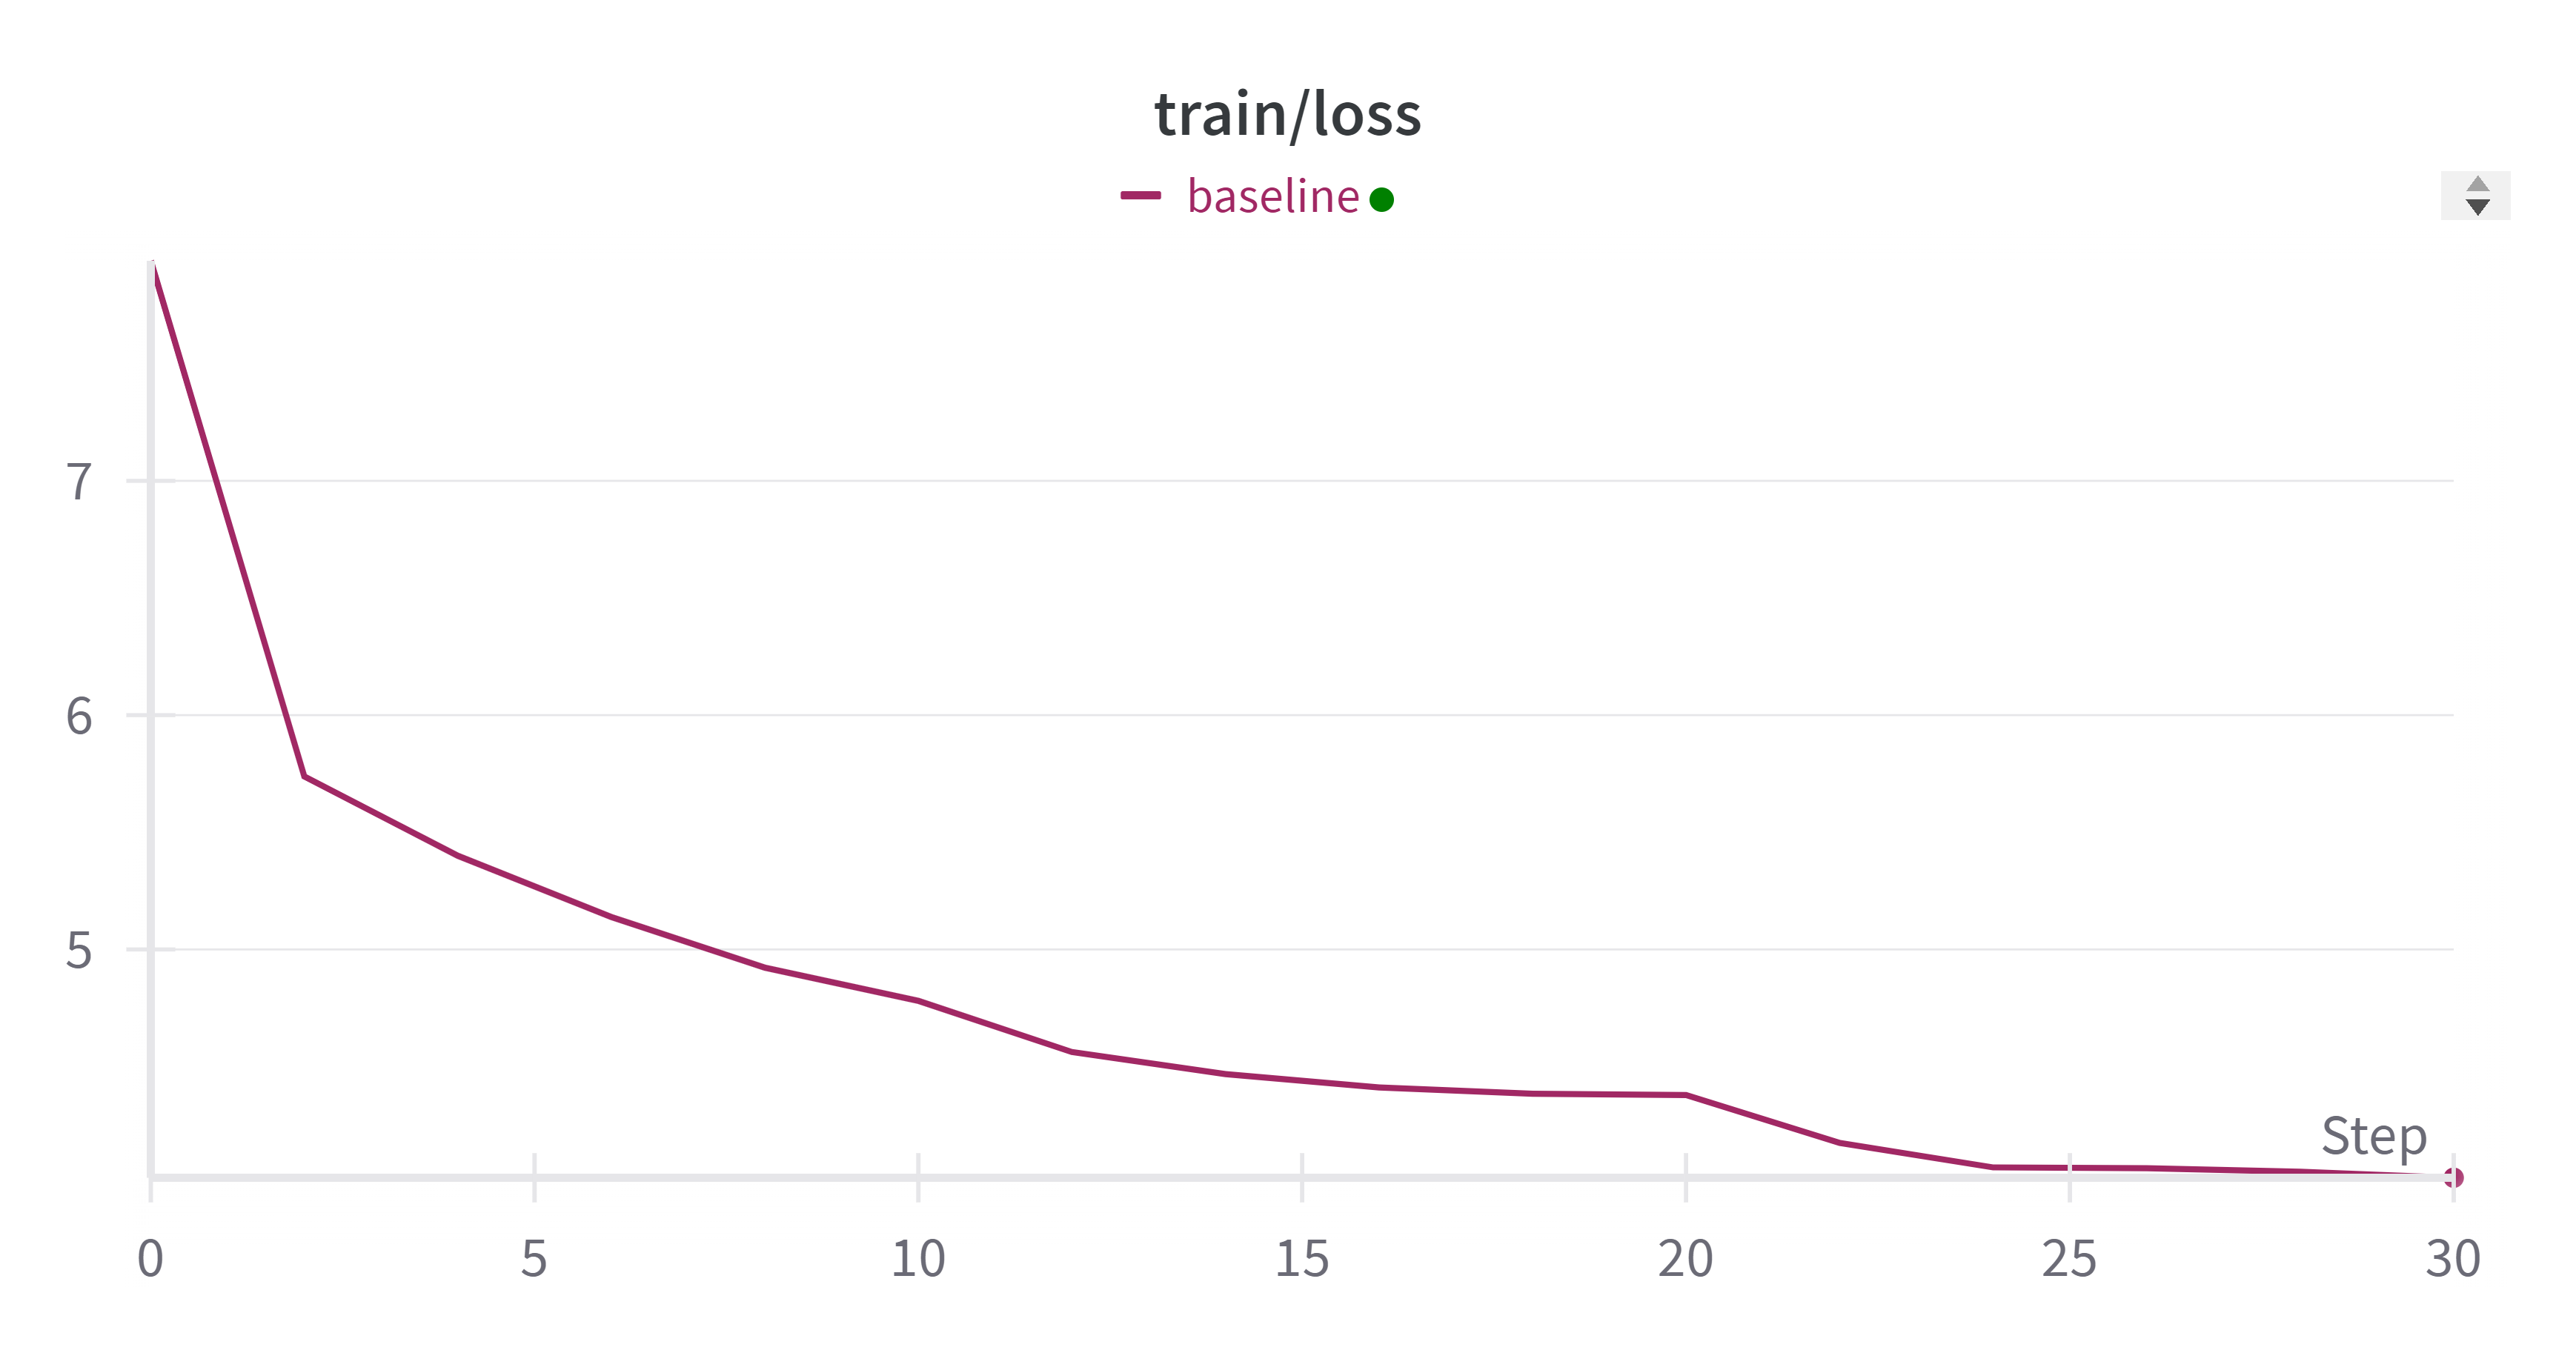
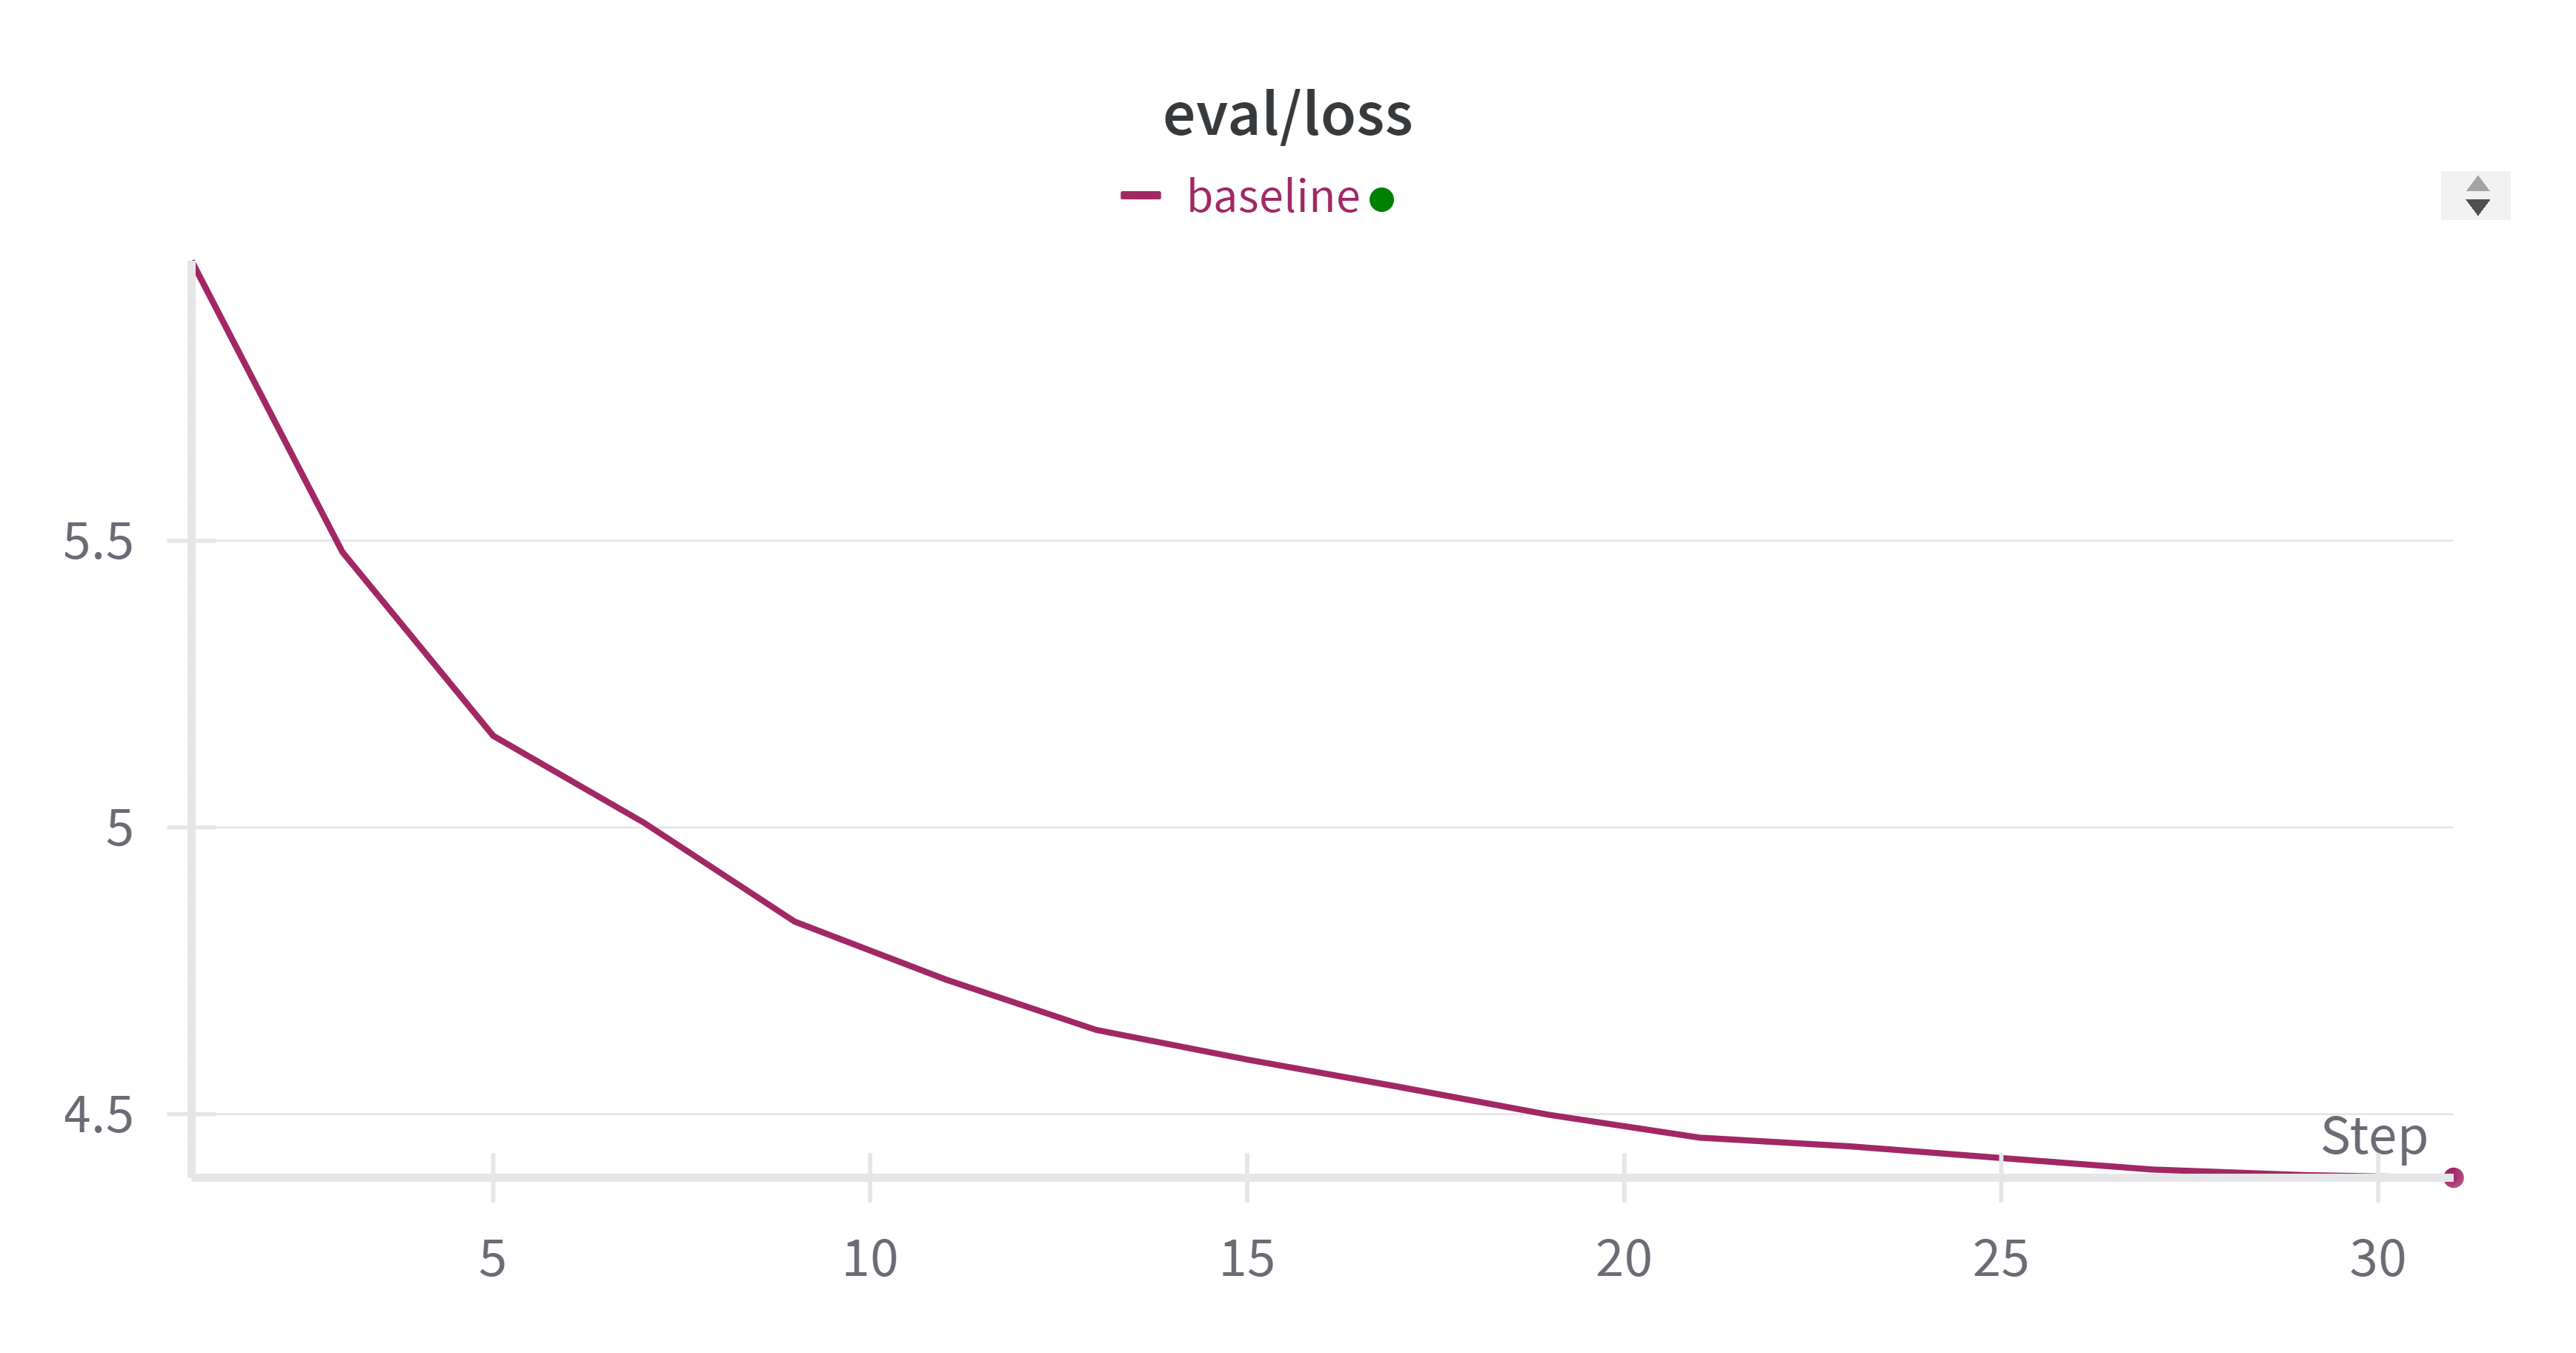
Baseline 性能报告
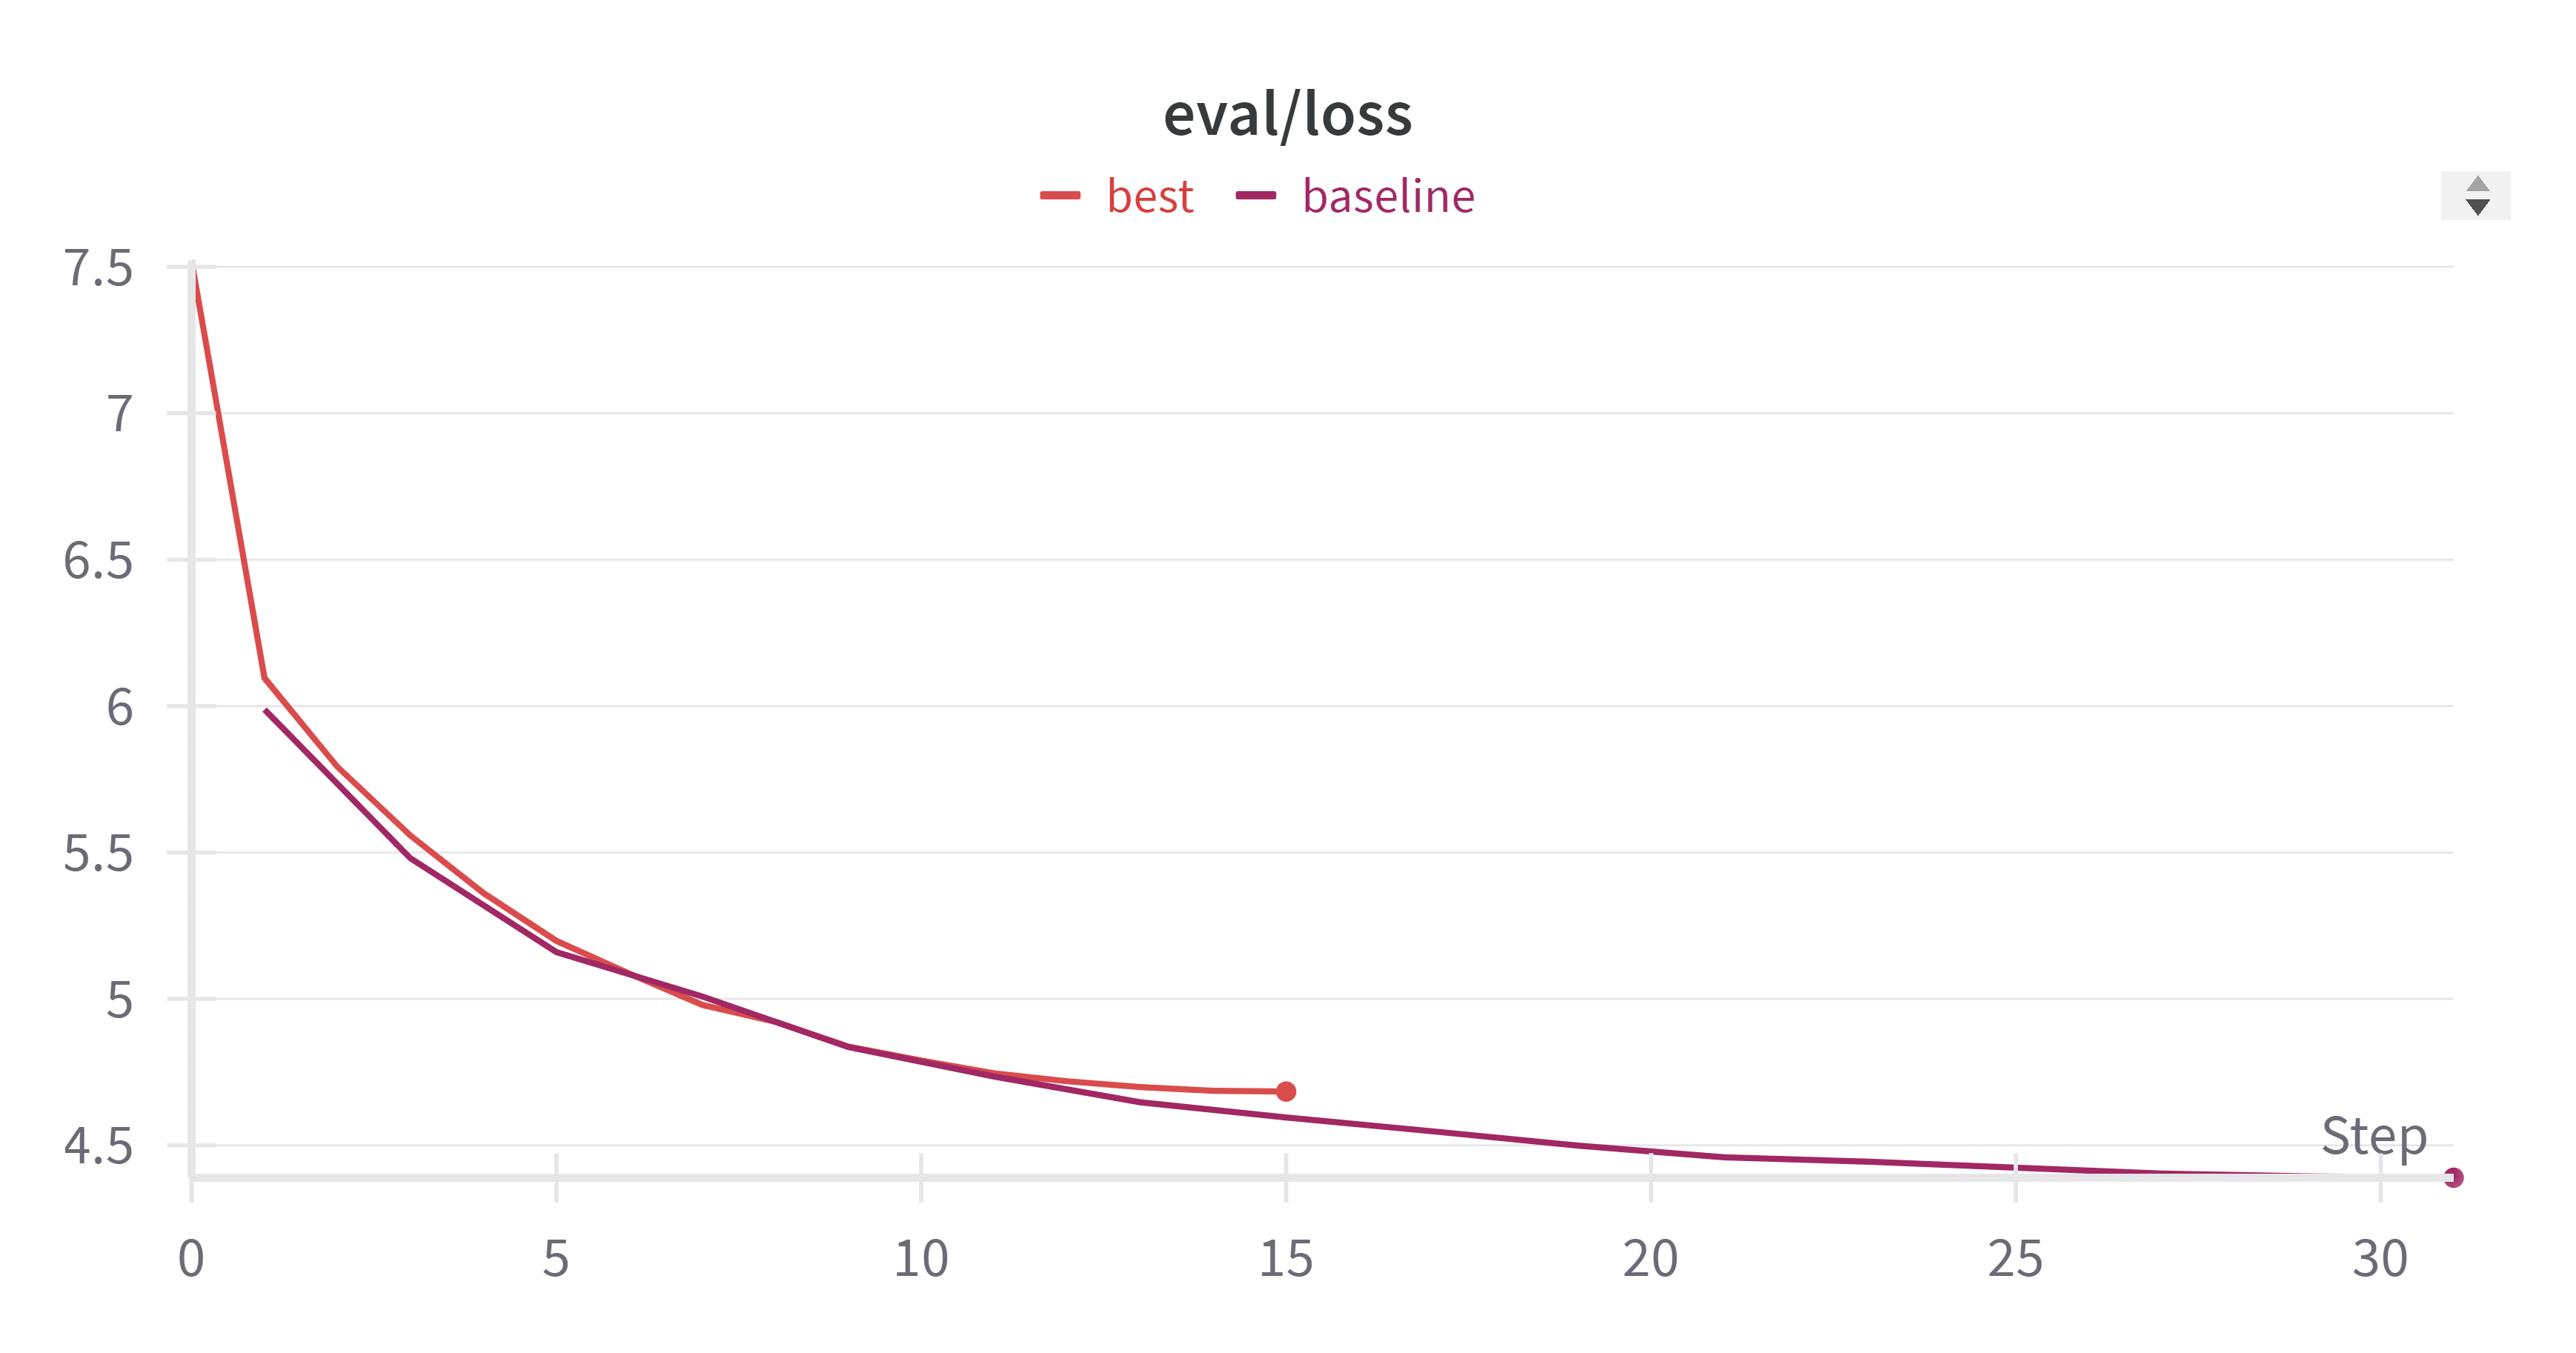
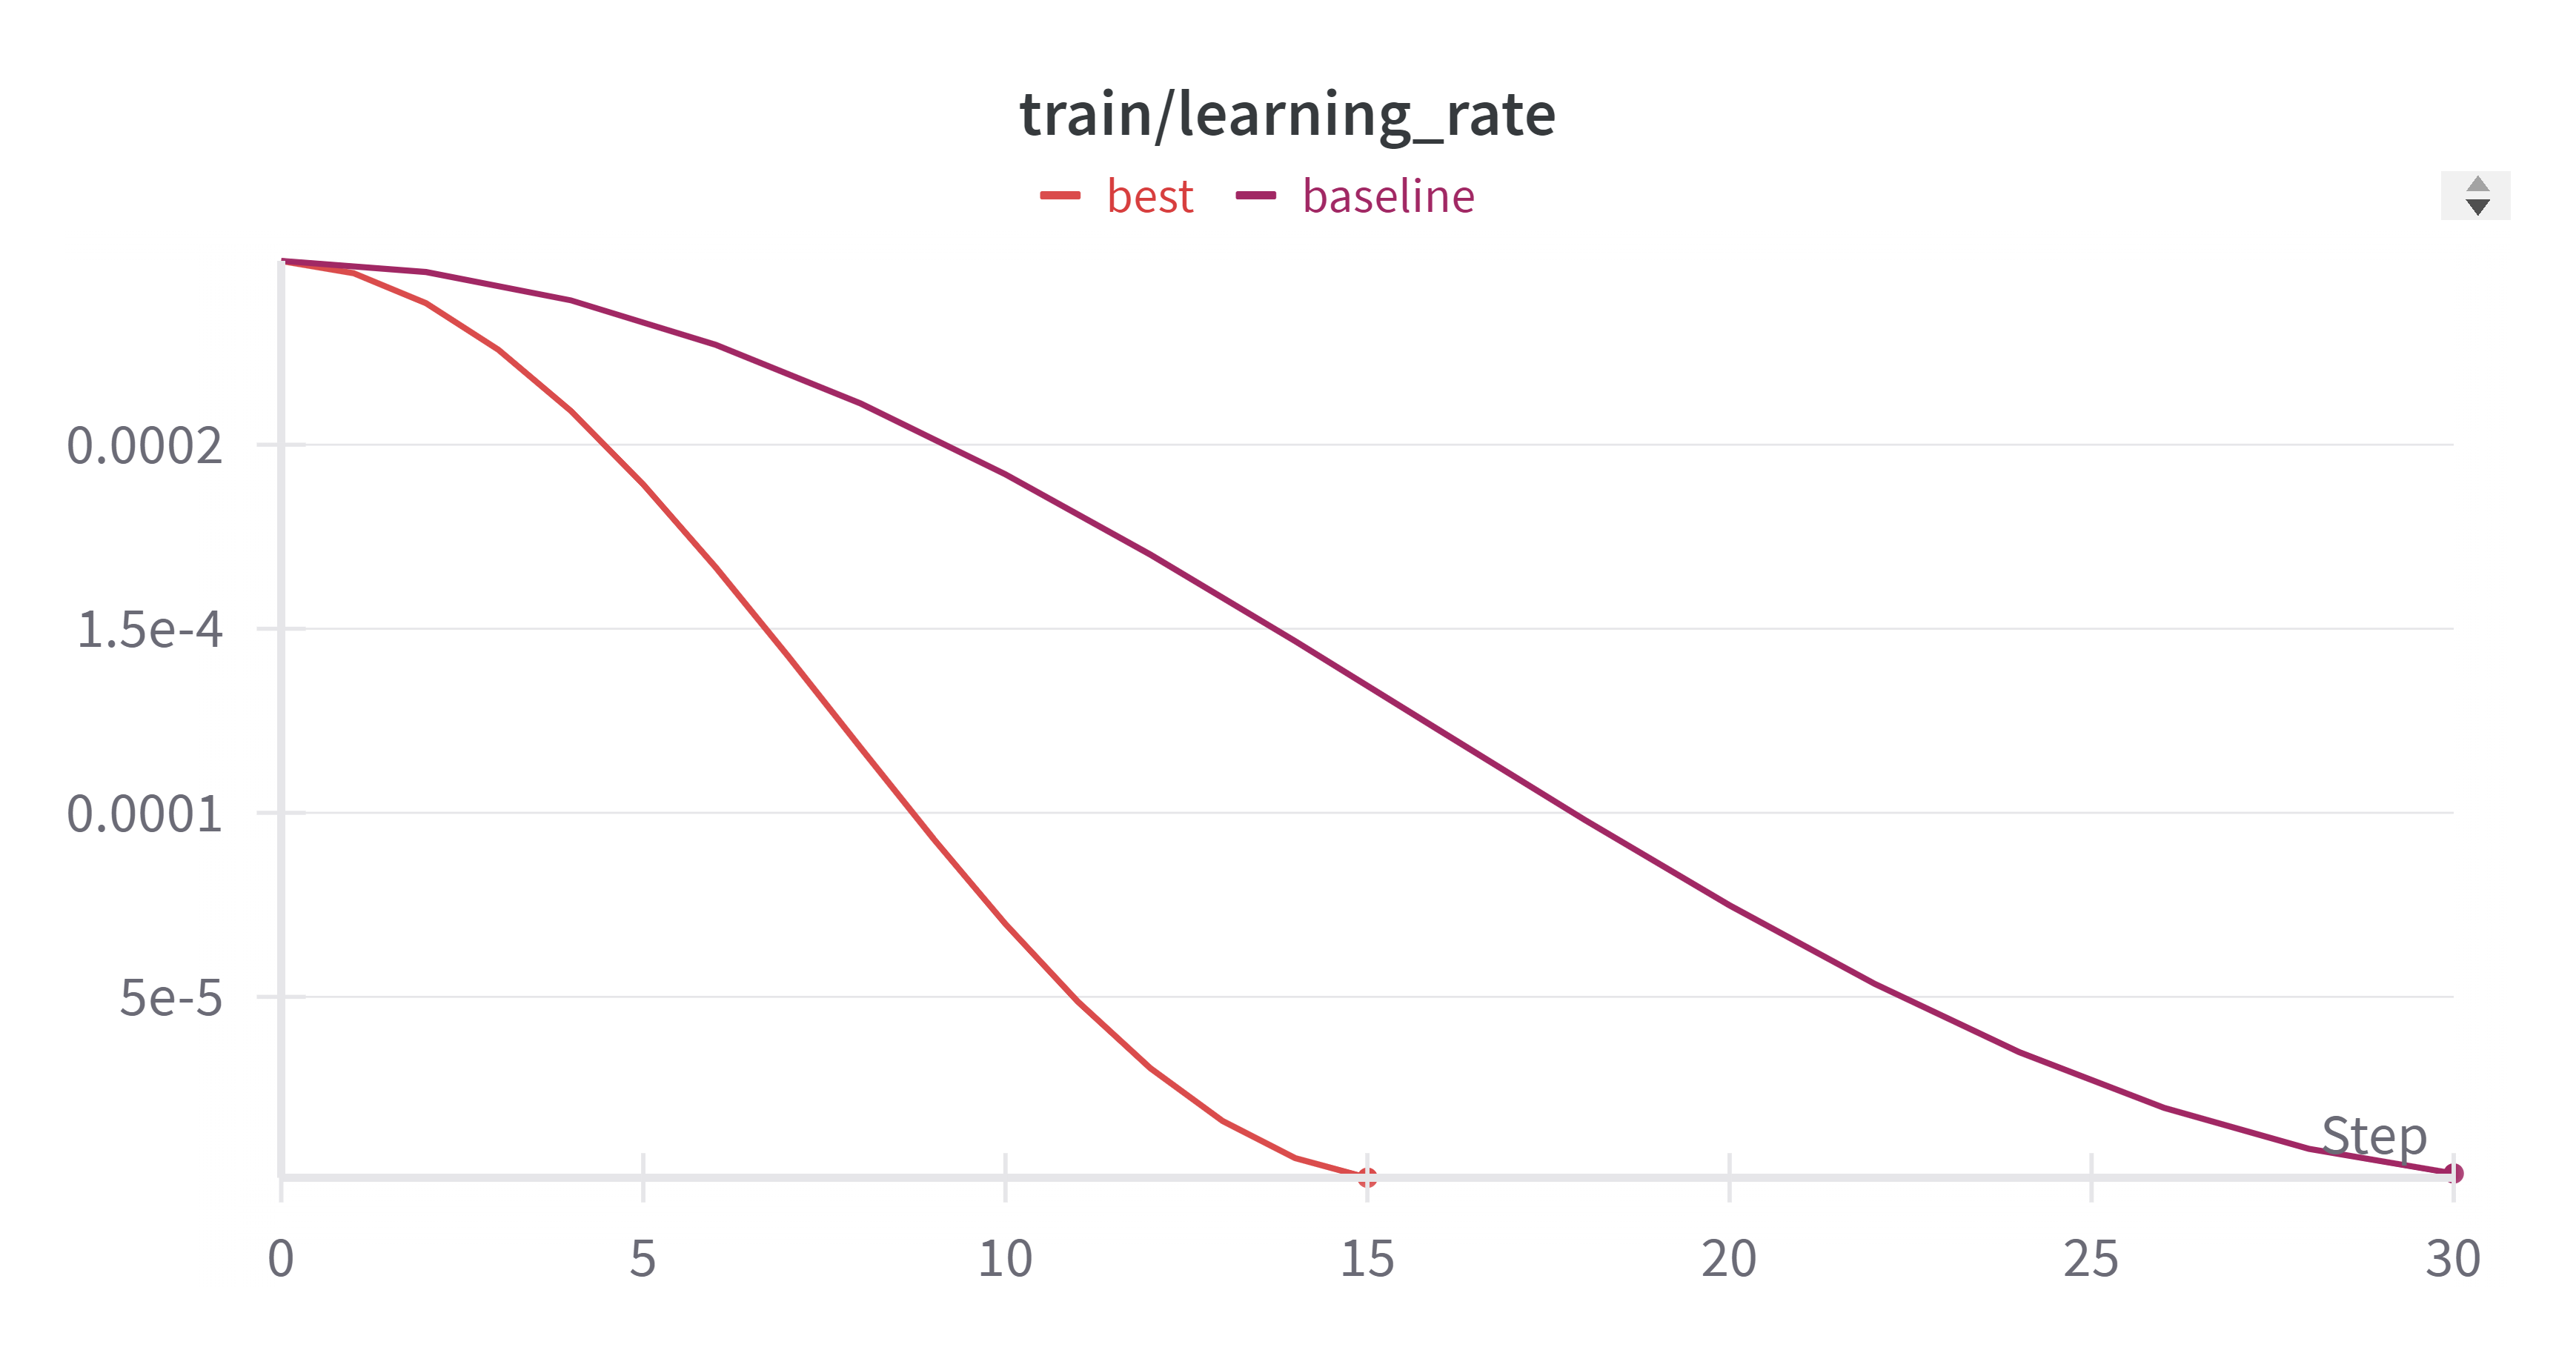
- train_loss 变化:
- eval_loss 变化:
- learning_rate 变化:
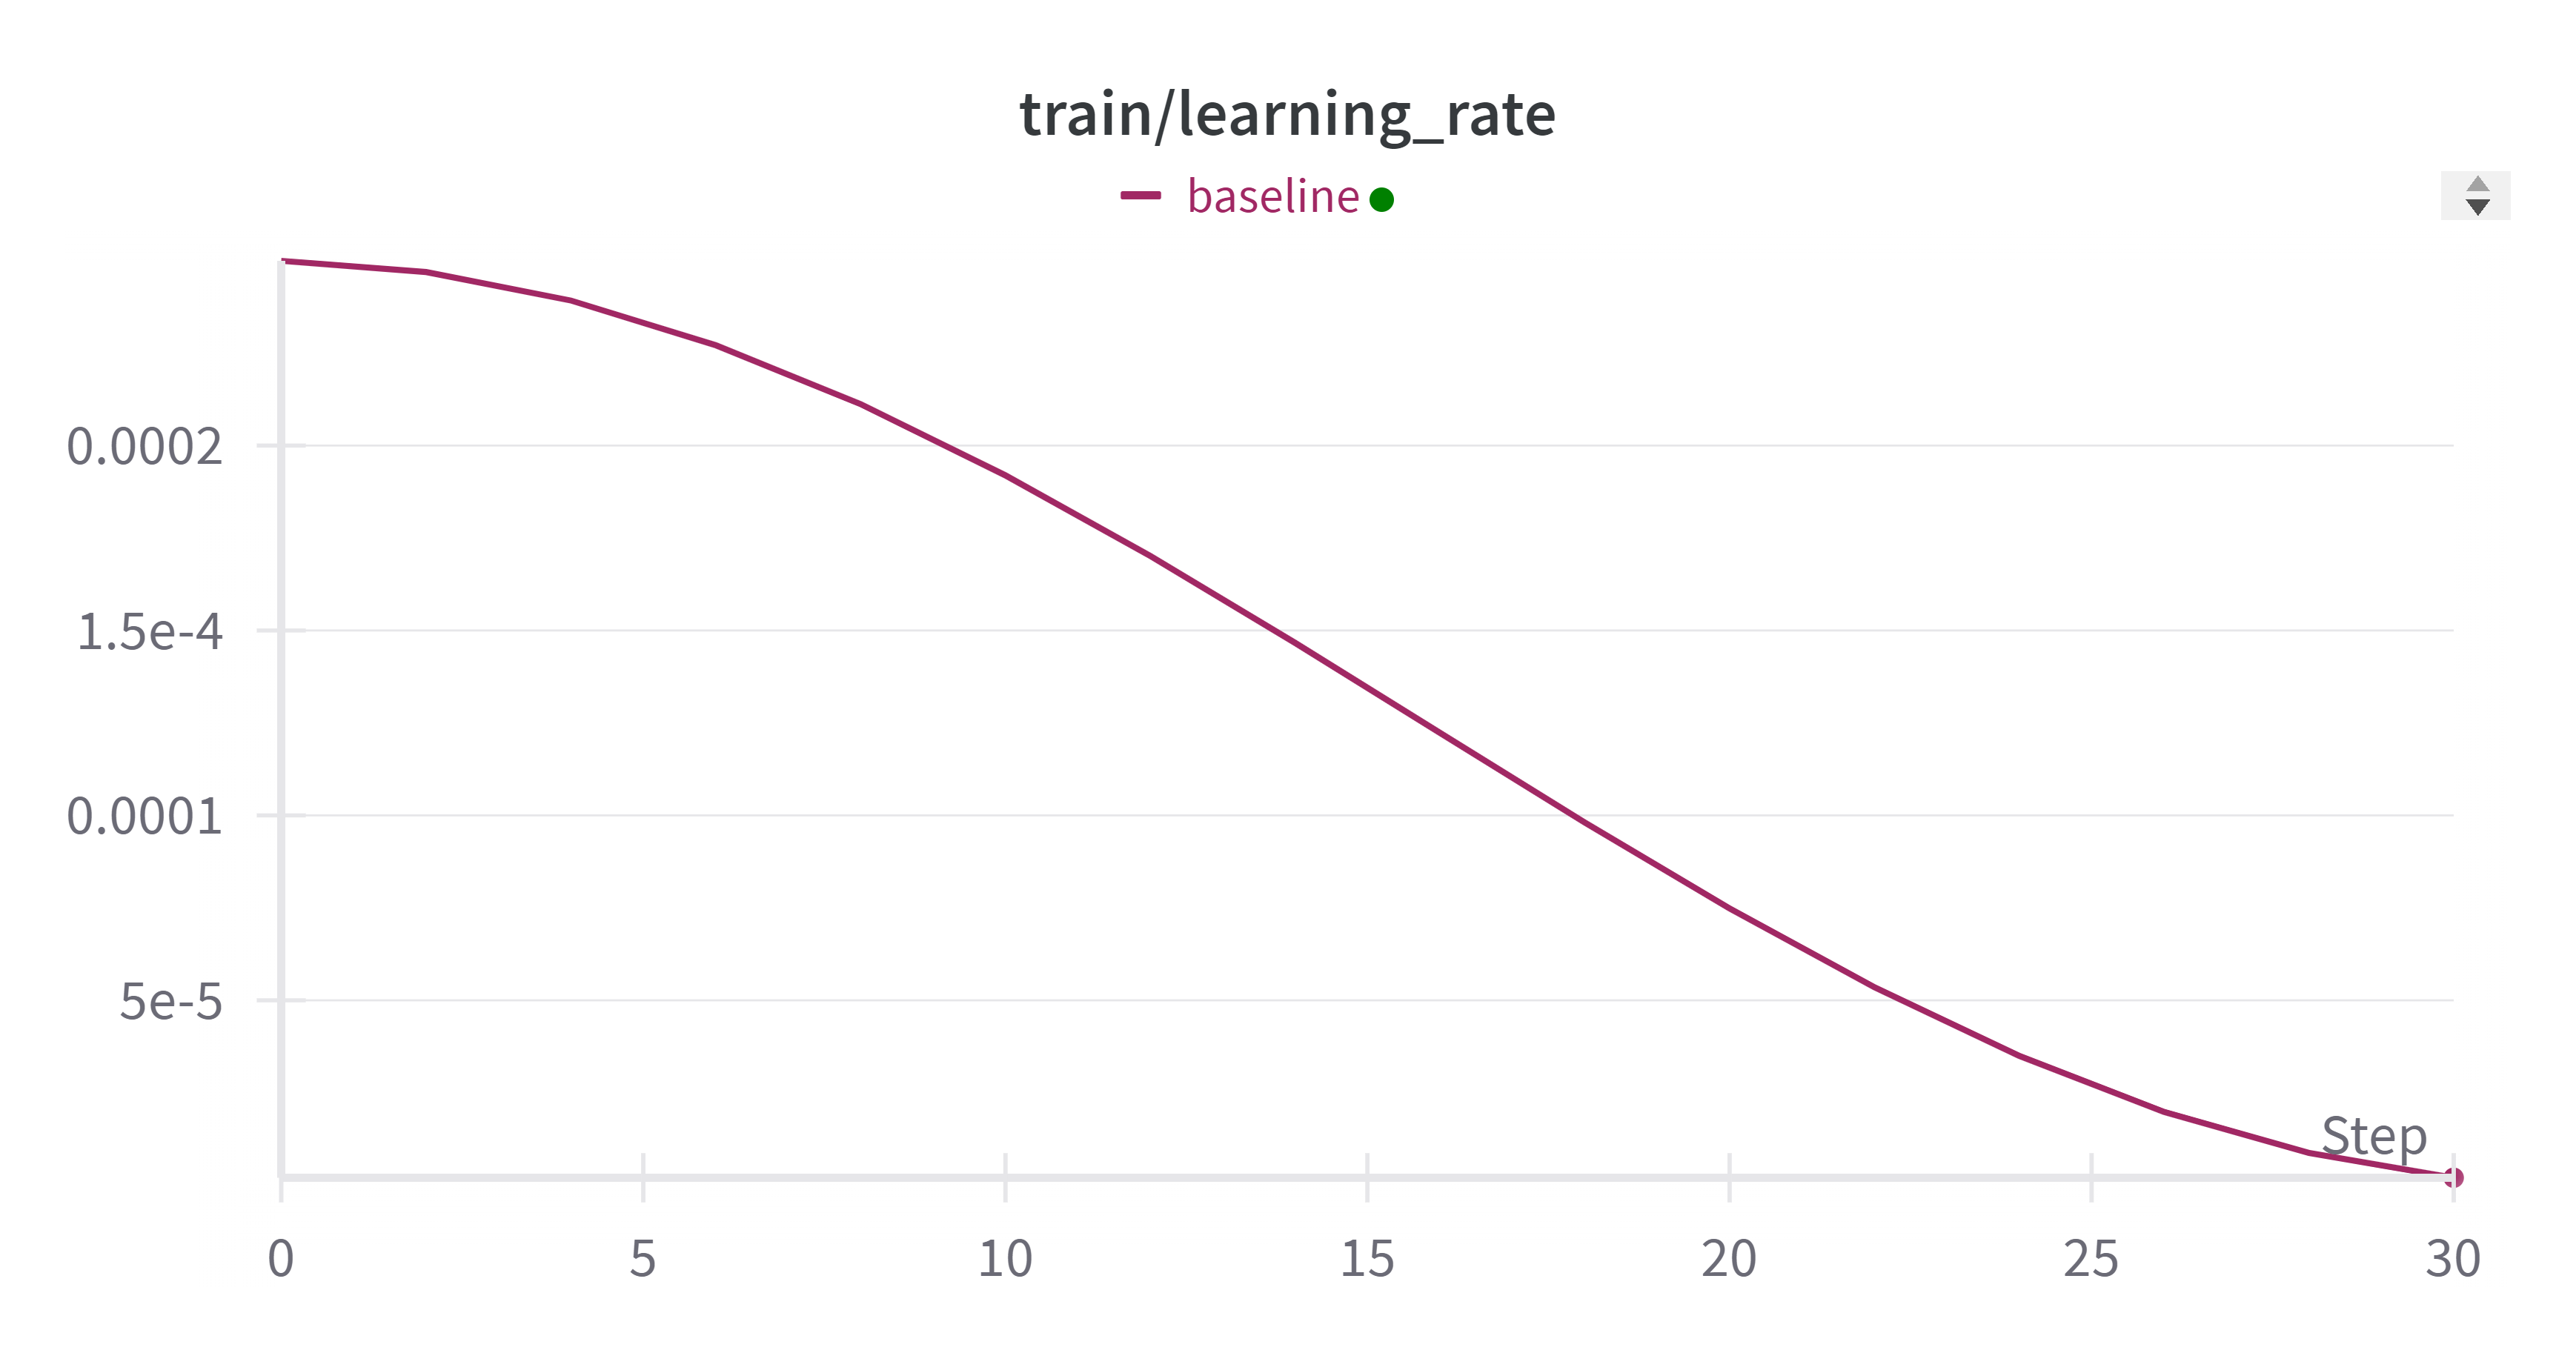
- 训练的总时间:
07:59
使用 Accelerate 加速框架进行分布式混合精度训练
使用 HuggingFace 提供的 accelerate 库,可以实现只需要修改几行代码就可以实现ddp训练,且支持混合精度训练和TPU训练。(甚至支持deepspeed。)
Accelerate 支持的训练方式为 CPU/单GPU (TPU)/多GPU(TPU)DDP模式/fp32/fp16 等。
Accelerate 简介:
- Accelerate 是一个库,通过添加四行代码,就可以让相同的 PyTorch 代码在任何分布式配置中运行!简而言之,它可以让大规模训练和推理变得简单、高效且适应性强。
安装 Accelerate 加速框架:1
pip install accelerate
框架配置:1
2
3
4
5
6
7
8
9
10
11
12
13
14
15
16
17
18
19
20(hpc) tarik@von:~/hpc$ accelerate config
----------------------------------------------------------------
In which compute environment are you running?
This machine
----------------------------------------------------------------
Which type of machine are you using?
multi-GPU
How many different machines will you use (use more than 1 for multi-node training)? [1]: 1
Should distributed operations be checked while running for errors? This can avoid timeout issues but will be slower. [yes/NO]: no
Do you wish to optimize your script with torch dynamo?[yes/NO]:no
Do you want to use DeepSpeed? [yes/NO]: no
Do you want to use FullyShardedDataParallel? [yes/NO]: no
Do you want to use Megatron-LM ? [yes/NO]: no
How many GPU(s) should be used for distributed training? [1]:2
What GPU(s) (by id) should be used for training on this machine as a comma-seperated list? [all]:all
Would you like to enable numa efficiency? (Currently only supported on NVIDIA hardware). [yes/NO]: no
----------------------------------------------------------------
Do you wish to use mixed precision?
no
accelerate configuration saved at /home/tarik/.cache/huggingface/accelerate/default_config.yaml
修改 baseline 代码:1
2
3
4
5
6
7
8
9
10
11
12
13
14
15
16
17+ from accelerate import Accelerator
+ accelerator = Accelerator(mixed_precision="fp16")
- device = "cuda"
+ device = accelerator.device
model.to(device)
model, optimizer, training_dataloader, scheduler = accelerator.prepare(
model, optimizer, training_dataloader, scheduler
)
- inputs = inputs.to(device)
- targets = targets.to(device)
outputs = model(inputs)
loss = loss_function(outputs, targets)
- loss.backward()
+ accelerator.backward(loss)
值得注意的是,在这里我启用了
FP16混合精度训练。混合精度通过使用较低精度的类型(如 fp16(半精度))来计算梯度,从而加速训练。
使用 Accelerator 框架,设置 FP16 的混合精度训练,在云超算平台上使用 2 张 3090 显卡进行分布式训练:
- 训练的总时间:
00:55 - train_loss:
4.34901 - eval_loss:
4.54709
其他详细性能指标我会在总结部分一同给出。
效果立竿见影,使用 Accelerator 框架进行多卡训练后,模型的训练速度加快了88.5%!
增大 batch_size 以充分利用显存
将环境迁移到云超算平台后,模型可用的显存由 6GB 增大到了 24GB。我进一步增大了训练的 batch_size,通过多次试验设置 batch_size=92,以保证显存占用率维持在 90% 以上,进一步增加了训练速度:
- 训练的总时间:
00:47 - train_loss:
4.51685 - eval_loss:
4.67991
在上一步的基础上,模型的训练速度进一步加快了14.5%!
优化性能总结报告
| batch_size | 精度 | 训练时间 | train_loss | eval_loss | 设备 | 加速框架 | GPU数量 |
|---|---|---|---|---|---|---|---|
| 96 | bf16 | 0:47 | 4.6979 | 4.71923 | 云 3090 | accelerate | 2 |
| 96 | fp16 | 0:47 | 4.51685 | 4.67991 | 云 3090 | accelerate | 2 |
| 32 | fp16 | 0:55 | 4.34901 | 4.54709 | 云 3090 | accelerate | 2 |
| 32 | fp16 | 2:28 | 3.89909 | 4.45961 | 本地 3060 Laptop | accelerate | 1 |
| 32 | fp32 | 5:40 | 4.728338183 | 4.467901 | 本地 3060 Laptop | 无 | 1 |
值得一提的是,对于这个模型,在我尝试使用
bf16的精度时,训练速度并不比fp16加速多少,但是train_loss和eval_loss均出现较大损失。因此,采用第二行的配置作为最佳优化方法。
- train_loss 变化:

- eval_loss 变化:
- learning_rate 变化:
- 训练的总时间:
00:47
赛题二:通义千问在MMMLU上的表现
前言
在本节中,我将详细描述对赛题二的思考、探索、编写和优化过程。我的解题策略是,首先使用 Transformers 库的原生文档提供的结构,构建一个基础的 Baseline 模型。在此基础上,进一步探索多种优化方法,包括使用加速框架、不同的模型量化方法、注意力计算机制、混合精度推理、分布式推理等技术。最后,我会在总结报告中给出所有方法性能对比。
Baseline
首先导入一下必要的库:1
2
3
4
5
6
7import torch
import re
from tqdm.notebook import tqdm
from time import time
device = torch.device("cuda" if torch.cuda.is_available() else "cpu")
载入数据集:1
2
3
4
5from datasets import load_dataset, load_from_disk
# ds = load_dataset("openai/MMMLU", "ZH_CN")["test"]
# ds.save_to_disk("MMMLU")
ds = load_from_disk("MMMLU")
按照题目要求的范围,进行数据预处理和数据集划分:1
filtered_ds = ds.filter(lambda example: example["Subject"] == "moral_scenarios").select(range(100))
载入预训练的模型和 tokenizer:1
2
3
4
5
6
7from transformers import AutoTokenizer, AutoModelForCausalLM
# model_name = "Qwen/Qwen2.5-0.5B"
model_name = "Qwen"
tokenizer = AutoTokenizer.from_pretrained(model_name)
model = AutoModelForCausalLM.from_pretrained(model_name, torch_dtype="auto", device_map="auto").to(device)1
2
3
4
5
6
7
8
9
10
11
12
13
14
15
16
17
18
19
20
21
22
23
24
25
26def create_prompt(example):
return {"prompt": f"问题: {example['Question']}\nA) {example['A']}\nB) {example['B']}\nC) {example['C']}\nD) {example['D']}\n请你给出答案(只输出一个字母): ", "answer": example["Answer"]}
prompts = filtered_ds.map(create_prompt)
total = len(prompts)
correct = 0
start_time = time()
for i in tqdm(range(0, total, batch_size)):
text_batch = prompts[i : i + batch_size]["prompt"]
model_inputs_batch = tokenizer(text_batch, return_tensors="pt", padding=True).to(model.device)
generated_ids_batch = model.generate(**model_inputs_batch, max_new_tokens=512, pad_token_id=tokenizer.eos_token_id)
generated_ids_batch = generated_ids_batch[:, model_inputs_batch.input_ids.shape[1] :]
response_batch = tokenizer.batch_decode(generated_ids_batch, skip_special_tokens=True)
responses = [response.strip()[-1] for response in response_batch]
correct += sum(response == answer for response, answer in zip(responses, prompts[i : i + batch_size]["answer"]))
end_time = time()
execution_time = end_time - start_time
accuracy = correct / total
print(f"Execution time: {execution_time:.2f} seconds")
print(f"Accuracy: {accuracy:.2f}")
Baseline 性能报告
- Accuracy:
0.2 - 推理时间:
300.49
使用 pipeline 加速推理流程
Hugging Face 为模型推理提供的 pipeline() 使得从 Hub 中使用任何模型进行任何语言、计算机视觉、语音和多模态任务的推理变得简单。
通过整合数据预处理、模型推理和结果后处理,pipeline减少了数据在各个步骤之间传输的成本,从而加速了整体流程。
将模型参数封装到 pipe 对象:1
2
3
4pipe = pipeline("text-generation", model_name, torch_dtype=torch.bfloat16, device_map="auto")
pipe.tokenizer.padding_side = "left"
results = pipe(prompts["prompt"], max_new_tokens=512, batch_size=batch_size)
- Accuracy:
0.2 - 推理时间:
282.16
其他详细性能指标我会在总结部分一同给出。
推理时间加速了 6.1%。
增大 batch_size 以充分利用显存
实际上,通过测试我发现,在本地机器上 6GB 的显存完全足够应付本测评任务,直接将 batch_size 拉到 100,显存实际占用 3GB 左右:
- Accuracy:
0.2 - 推理时间:
31.87
推理时间加速了 89.4%。
使用 Accelerate 加速框架进行分布式混合精度推理
Accelerate 提供的最大进步之一是 大型模型推理,它允许对无法完全安装在显卡上的模型进行推理。虽然本赛题使用的模型参数并不大,但是将模型卸载到两张卡上,进行分布式推理,能充分利用多卡环境的优势以加速推理。1
2
3
4
5
6
7
8
9from accelerate import infer_auto_device_map, dispatch_model
model = AutoModelForCausalLM.from_pretrained(
model_name,
torch_dtype=torch.float16,
)
model = dispatch_model(model, device_map=infer_auto_device_map(model))
- Accuracy:
0.21 - 推理时间:
12.49
相比单卡的推理时间 16.12,使用多卡推理时间加速了 22.5%。
稍后我会在总结报告中给出所有方法性能对比。
尝试:使用 FlashAttention-2 快速注意力机制
FlashAttention-2 是标准注意力机制的更快更高效的实现,它可以通过以下方式显著加快推理速度:
- 在序列长度上并行化注意力计算
- 将工作划分到 GPU 线程之间,以减少它们之间的通信和共享内存读写操作
这里因为版本有点问题,我从原仓库克隆 whl,使用手动编译安装 FlashAttention-2:1
2
3pip install packaging
pip install ninja
pip install ./flash_attn-2.7.0.post2+cu12torch2.5cxx11abiFALSE-cp39-cp39-linux_x86_64.whl
启用 FlashAttention-2:1
2
3
4
5model = AutoModelForCausalLM.from_pretrained(
model_name,
torch_dtype=torch.bfloat16,
attn_implementation="flash_attention_2",
)
但是在本模型上,我在启用 FlashAttention-2 后,推理速度从 12.49 下降到 24.56,推测是对于较小的模型和简单的任务,FlashAttention-2 的优化可能无法显现,因为其设计目标是在处理长序列和大模型时提升性能。
尝试:使用 bitsandbytes 对模型进行 4位/8位量化
bitsandbytes 是一个量化库,它包括对 4 位和 8 位量化的支持。量化会减少模型相对于其原生全精度版本的大小,使其更容易将大型模型适应内存有限的 GPU。
安装 bitsandbytes:1
pip install bitsandbytes
以 4 位加载模型,然后启用 BetterTransformer 与 FlashAttention:1
2
3
4
5
6
7
8
9
10
11
12
13
14
15
16
17
18from transformers import AutoTokenizer, AutoModelForCausalLM, BitsAndBytesConfig
from accelerate import infer_auto_device_map, dispatch_model
model_name = "Qwen"
quantization_config = BitsAndBytesConfig(load_in_4bit=True, bnb_4bit_compute_dtype=torch.bfloat16)
model = AutoModelForCausalLM.from_pretrained(
model_name,
torch_dtype=torch.float16,
attn_implementation="flash_attention_2",
quantization_config=quantization_config,
)
model = dispatch_model(model, device_map=infer_auto_device_map(model))
tokenizer = AutoTokenizer.from_pretrained(model_name, padding_side="left")
batch_size = 100
但是对于本模型和硬件配置来说,应该由于不支持 4位/8位量化计算,不仅在量化后由于精度亏损导致准确率严重下降,而且推理时间反而因此变慢。但是,对于其他具有着极大参数的语言模型,难以适配有限的显存,4位/8位量化仍然是一个值得探索的方向。
优化性能总结报告
| batch_size | 精度 | 推理时间 | accuracy | 推理方法 | 设备 | 加速框架/量化方法 | GPU数量 |
|---|---|---|---|---|---|---|---|
| 100 | fp16 | 12.49 | 0.21 | generate | 云 3090 | accelerate | 2 |
| 100 | fp16 | 16.12 | 0.21 | pipeline | 云 3090 | 无 | 1 |
| 100 | bf16 | 16.15 | 0.15 | pipeline | 云 3090 | 无 | 1 |
| 100 | fp16 | 24.56 | 0.21 | generate | 云 3090 | accelerate+flash_attn | 2 |
| 100 | fp16 | 27.9 | 0.03 | generate | 云 3090 | accelerate+4bit | 2 |
| 100 | fp32 | 31.87 | 0.2 | pipeline | 云 3090 | 无 | 1 |
| 100 | fp16 | 35.27 | 0.06 | generate | 云 3090 | accelerate+flash_attn+4bit | 2 |
| 1 | fp32 | 282.16 | 0.2 | pipeline | 云 3090 | 无 | 1 |
| 1 | fp32 | 300.49 | 0.2 | generate | 云 3090 | 无 | 1 |